Fun stuff for kids and parents

Tried and tested on willing guinea piglets

This optimistic, self-employed writer, translator, columnist and mum knows that with kids, a dash of charm and a good giggle beat fear of failure every time.

So here are some out-of-the-box ideas to keep kids and parents happy for hours...

Thursday 29 May 2014

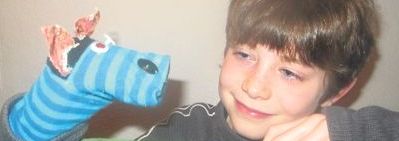
Recycle your own dog from an old shirt and odd socks

A fun friend for Watson. Though he doesn't look too amused.
Here's how to make one yourself!

Here's what you'll need.
Except we didn't end up using the roll of baking paper to make a pattern.

We used a shirt that was meant for a 2-year-old.
Fold it down the back (the collar is on the right).

Jake realised that the arms looked like ears.
So we cut the nose out of the collar.

Here you can see where we cut. Now you may be thinking this nose is a bit long.
A bit more like an elephant/mouse/pig than a dog. You'd be right.
But as it is a gift for Petra, who is only 6 months old, I doubt she'll mind.
You might want your dog's nose a bit blunter. Up to you :o).
And if you want to cut rounder ears out, you can. 
Then Jake flattened out the shirt and cut carefully halfway
around the top of one sleeve...
And along the side seam (the sleeve is under his left hand).

And did the same the other side. Along the side seam
and up over the sleeve.

For fun, he tried it on. Cool! Check out that six pack!
This is the point when you can sew eyes on under the ears.
We didn't think about it at the time.
We were too excited and folded the sleeves in like this...
...folded the whole skirt over (so it looks inside out).

Pinned it (and tack it if you're sensible). It's ready to sew.
What about a tail???? Good point!
We cut one out of the front of the shirt.
Two pieces that look like this (with the right sides together).

Then sewed them together.

Like this.

Use a ruler to poke it right sides out again.

Now for the body. 

Jake did along the back up to where it got thick where the ears began.

That was where we realised our poor machine was going to have a
hard time sewing through all those layers of material. 

We used two needles but finally it worked :o).

We stuffed the tail with the insides of an old pillow.

Turned the body the right way out and stuffed it too. 

Fitted the tail inside the end of the body and sewed it on the machine.
Found four old socks that almost matched.

Turned them inside out and sewed the ends a bit shorter on the machine.
Old baby socks would look cuter perhaps.
Cut a nose and eye pupils out of an old black sock and cut a smile and
eyeballs out of the ends of the pink socks.
I'll sew them on by hand when I get a spare moment.

Looks like teddy needs putting back together again too.
Naughty Dr Watson. He's been reading Hound of the Baskerville's again!

Monday 19 May 2014

Oops...been a busy couple of weeks but....

....here come some more animals from
Odsherred Zoo og Rescue Centre

These were the dear little monkeys that watched us raking
the path and hedges
And this was another little fellow...

...who liked making thumbprints on the windows.

This is a coypu. There are lots of these in Norfolk where I come from in England.
They are not meant to be there and make big holes in the river banks.
Either he's being ambushed from behind by a snake or that's his tail!

Peacocks are beautiful but cry like a baby that hasn't been fed for days!
Kid's Corner.
We call them 'patty goats' in our family.
Goat patties would be something else.
Nothing better than a daily lama.
Is this an ostrich or an emu?
Well, whatever the case, here, for those of you who
remember him and those who don't is a link to the
rather naughty Rod Hull and his pet emu
How to groom an emu

Tuesday 6 May 2014

Ark angels


We’ve driven past the gates a hundred times. High wooden gates flanked by tall hedges near our summer cottage. But we’ve never been inside. So when we heard some months ago that this particular animal rescue centre was looking for sponsors to help keep its head above water, we felt a bit guilty. And we were therefore extra happy to see a notice on Facebook asking for all hands on deck to help get the place shipshape for the new season. We fished out some old clothes and arrived bubbling with excitement. I hadn’t considered that we must look like tramps. I hadn’t dreamt we would be the only ones. But apparently my message had been overlooked in the flood of emails and chores to be done. The notice on the website asking for volunteers should really have been deleted due to a technicality – it would have cost DKK 1500 per nose to insure each helper.

Undaunted


Determined not to let this dampen our spirits, we smiled brightly at the kind lady who explained the problem, seized two rakes and spent the next three hours mucking out. Not the cute little ponies. Not the adorable otters.
Not the zebra. Nor even the iguana. No, we were understandably not allowed into the park itself. And as Jake has broken his arm twice and his toe once in the past year, that was OK. No Jake and I spent three hours mucking out the hedges on either side of the driveway.


Just desserts
We were pretty wrecked afterwards but the sweet little monkeys in the enclosure nearby kept our spirits up by waving and cheering us on. Luckily the weather was nice too and so were the ice creams and cola we got for helping. We also got free tickets for when the park was open, the zookeepers were not so busy and visitors were insured. 

We'll be posting more photos over the next few weeks...so stay tuned.

Thursday 1 May 2014

Making masks

Some of that is chocolate :o)

You will need:

Face cream
Plaster bandage - gipsbandage in Danish, which you can buy at the chemist (Apotek) for about 25 kr for 2 metres
Scissors
Elastic or elastic bands
Paints 
Water so make the plaster go mushy
I can't remember what that big bit of paper is in the middle, possibly the wrapper off the bandage...but I'm going to call it 'face tissue' because that would have been useful.

 Careful with the scissors...

Useful tip:

Don't start with the youngest child.
Start with the oldest so the little ones can see what is coming


First Julie put the face cream on
to stop the plaster sticking to Jake's face for ever.


Then I cut sections of bandage and Julie
dipped them in the water and applied them to Jake's face
 one at a time overlapping.


That was when Jake realised he has upside-down underpants
on his head because we couldn't find a hairband :O). Clean ones.


The sections were about this size but smaller over the nose.


Nearly done...


Laura's turn now!


Cream first. Ooh it's cold


But it doesn't hurt...unless you get hair mixed up in it.


 All done


 By that time, it wasn't toooooo long before Jake's mask
had dried out enough to take it off. Check carefully first though.


Oh it feels stiff.


Laura's mask left a funny butterfly shape. But it all came off with face cream.


Now Julie tidied up around the edges and the eyeholes.


And it was time to paint them pretty colours.


We used oil paints that dissolved in water.
All except the red, which didn't and got everywhere.


Rainbows.


Ready to dry again.


...near the stove but not too near.


When they were totally dry, even the red, we carefully
poked holes near the eyeholes with a skewer... Not too close to the edges though.

...and as we didn't have any elastic, we joined up elastic bands to make the straps. 


And then they were ready to wear.
Clever kids and thank you, Julie!
It would be easy to make a spiderman, 
tiger or just colourful mask.